The documentation you are viewing is for Dapr v1.8 which is an older version of Dapr. For up-to-date documentation, see the latest version.
指南:发布消息并订阅主题
介绍
Pub/Sub 是一个分布式系统中的常见模式,它有许多服务用于解偶、异步消息传递。 使用Pub/Sub,您可以在事件消费者与事件生产者解偶的场景中启用。
Dapr 提供了一个可扩展的 Pub/Sub 系统(保证消息至少传递一次),允许开发者发布和订阅主题。 Dapr 为 Pub/Sub 提供组件,使操作者能够使用他们所喜欢的基础设施,例如 Redis Streams 和 Kafka 等。
步骤 1: 设置 Pub/Sub 组件
当发布消息时,必须指定所发送数据的内容类型。 除非指定, Dapr 将假定类型为 text/plain。 当使用 Dapr 的 HTTP API时,内容类型可以设置在 Content-Type 头中。 gRPC 客户端和 SDK 有一个专用的内容类型参数。
步骤 1: 设置 Pub/Sub 组件
然后发布一条消息给 deathStarStatus 主题:
第一步是设置 Pub/Sub 组件:
运行 dapr init 时默认在本地机器上安装 Redis 流。
在 Linux/MacOS 上打开 ~/.dapr/components/pubsub.yam 或在 Windows 上打开%UserProfile%\.dapr\components\pubsub.yaml 组件文件以验证:
apiVersion: dapr.io/v1alpha1
kind: Component
metadata:
  name: pubsub
spec:
  type: pubsub.redis
  version: v1
  metadata:
  - name: redisHost
    value: localhost:6379
  - name: redisPassword
    value: ""
You can override this file with another Redis instance or another pubsub component by creating a components directory containing the file and using the flag --components-path with the dapr run CLI command.
To deploy this into a Kubernetes cluster, fill in the metadata connection details of your desired pubsub component in the yaml below, save as pubsub.yaml, and run kubectl apply -f pubsub.yaml.
apiVersion: dapr.io/v1alpha1
kind: Component
metadata:
  name: pubsub
  namespace: default
spec:
  type: pubsub.redis
  version: v1
  metadata:
  - name: redisHost
    value: localhost:6379
  - name: redisPassword
    value: ""
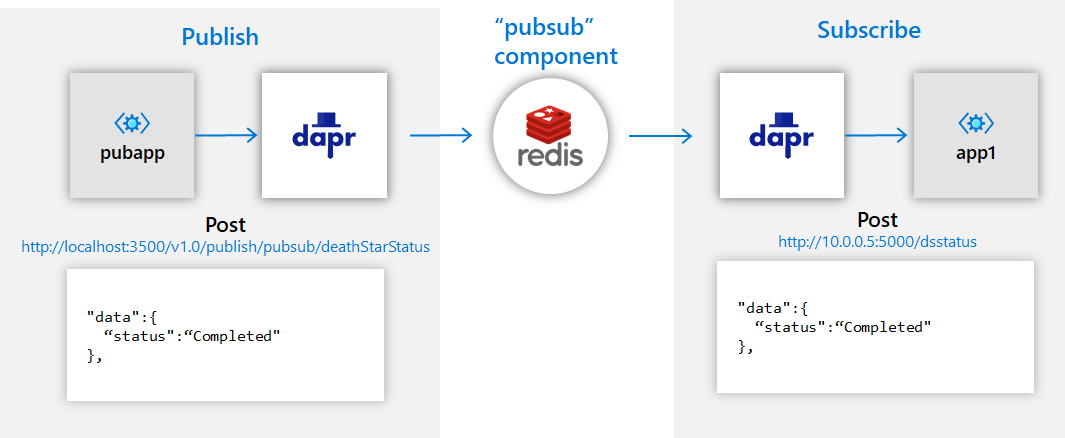
步骤 2: 订阅主题
Dapr 允许两种方法订阅主题:
- 声明式,其中定义在外部文件中。
- 编程方式,订阅在用户代码中定义
Note
声明和编程方式都支持相同的功能。 声明的方式从用户代码中移除对 Dapr 的依赖性,并允许使用现有应用程序订阅主题。 编程方法在用户代码中实现订阅。声明式订阅
您可以使用以下自定义资源定义 (CRD) 订阅主题。 创建名为 subscription.yaml 的文件并粘贴以下内容:
apiVersion: dapr.io/v1alpha1
kind: Subscription
metadata:
  name: myevent-subscription
spec:
  topic: deathStarStatus
  route: /dsstatus
  pubsubname: pubsub
scopes:
- app1
- app2
上面的示例显示了 deathStarStatus主题的事件订阅,对于pubsub 组件 pubsub。
route告诉 Dapr 将所有主题消息发送到应用程序中的/dsstatus端点。scopes为app1和app2启用订阅。
设置组件:
将 CRD 放在 ./components 目录中。 当 Dapr 启动时,它将加载组件和订阅。
注意:默认情况下,在 MacOS/Linux 上从 $HOME/.dapr/components 加载组件,以及 %USERPROFILE%\.dapr\components 在Windows上。
还可以通过将 Dapr CLI 指向组件路径来覆盖默认目录:
dapr run --app-id myapp --components-path ./myComponents -- python3 app1.py
注意:如果你将订阅置于自定义组件路径中,请确保Pub/Sub 组件也存在。
在 Kubernetes 中,将 CRD 保存到文件中并将其应用于群集:
kubectl apply -f subscription.yaml
Example
创建名为 app1.py 的文件,并粘贴以下内容:
import flask
from flask import request, jsonify
from flask_cors import CORS
import json
import sys

app = flask.Flask(__name__)
CORS(app)

@app.route('/dsstatus', methods=['POST'])
def ds_subscriber():
    print(request.json, flush=True)
    return json.dumps({'success':True}), 200, {'ContentType':'application/json'}

app.run()
创建名为" app1.py 的文件,并粘贴如下内容:
pip install flask
pip install flask_cors
创建 app1.py 后,确保 flask 和 flask_cors 已经安装了:
dapr --app-id app1 --app-port 5000 run python app1.py
设置上述订阅后,将此 javascript(Node > 4.16)下载到 app2.js 文件中:
const express = require('express')
const bodyParser = require('body-parser')
const app = express()
app.use(bodyParser.json({ type: 'application/*+json' }));

const port = 3000

app.post('/dsstatus', (req, res) => {
    console.log(req.body);
    res.sendStatus(200);
});

app.listen(port, () => console.log(`consumer app listening on port ${port}!`))
设置上述订阅后,将此 javascript(Node > 4.16)下载到 app2.js 文件中:
dapr --app-id app2 --app-port 3000 run node app2.js
创建名为 app1.py 的文件,并粘贴以下内容:
<?php

require_once __DIR__.'/vendor/autoload.php';

$app = \Dapr\App::create();
$app->post('/dsstatus', function(
    #[\Dapr\Attributes\FromBody]
    \Dapr\PubSub\CloudEvent $cloudEvent,
    \Psr\Log\LoggerInterface $logger
    ) {
        $logger->alert('Received event: {event}', ['event' => $cloudEvent]);
        return ['status' => 'SUCCESS'];
    }
);
$app->start();
在创建 app1.php并安装 SDK后, 继续启动应用程序:
dapr --app-id app1 --app-port 3000 run -- php -S 0.0.0.0:3000 app1.php
编程方式订阅
若要订阅主题,请使用您选择的编程语言启动 Web 服务器,并监听以下 GET 终结点: /dapr/subscribe。 Dapr 实例将在启动时调用到您的应用,并期望对的订阅主题响应 JOSN:
pubsubname: Dapr 用到的 pub/sub 组件topic: 订阅的主题route:当消息来到该主题时,Dapr 需要调用哪个终结点
Example
import flask
from flask import request, jsonify
from flask_cors import CORS
import json
import sys

app = flask.Flask(__name__)
CORS(app)

@app.route('/dapr/subscribe', methods=['GET'])
def subscribe():
    subscriptions = [{'pubsubname': 'pubsub',
                      'topic': 'deathStarStatus',
                      'route': 'dsstatus'}]
    return jsonify(subscriptions)

@app.route('/dsstatus', methods=['POST'])
def ds_subscriber():
    print(request.json, flush=True)
    return json.dumps({'success':True}), 200, {'ContentType':'application/json'}
app.run()
创建 app1.py 后,确保 flask 和 flask_cors 已经安装了:
pip install flask
pip install flask_cors
然后运行:
dapr --app-id app1 --app-port 5000 run python app1.py
const express = require('express')
const bodyParser = require('body-parser')
const app = express()
app.use(bodyParser.json({ type: 'application/*+json' }));

const port = 3000

app.get('/dapr/subscribe', (req, res) => {
    res.json([
        {
            pubsubname: "pubsub",
            topic: "deathStarStatus",
            route: "dsstatus"
        }
    ]);
})

app.post('/dsstatus', (req, res) => {
    console.log(req.body);
    res.sendStatus(200);
});

app.listen(port, () => console.log(`consumer app listening on port ${port}!`))
运行此应用:
dapr --app-id app2 --app-port 3000 run node app2.js
更新 app1.php
<?php

require_once __DIR__.'/vendor/autoload.php';

$app = \Dapr\App::create(configure: fn(\DI\ContainerBuilder $builder) => $builder->addDefinitions(['dapr.subscriptions' => [
    new \Dapr\PubSub\Subscription(pubsubname: 'pubsub', topic: 'deathStarStatus', route: '/dsstatus'),
]]));
$app->post('/dsstatus', function(
    #[\Dapr\Attributes\FromBody]
    \Dapr\PubSub\CloudEvent $cloudEvent,
    \Psr\Log\LoggerInterface $logger
    ) {
        $logger->alert('Received event: {event}', ['event' => $cloudEvent]);
        return ['status' => 'SUCCESS'];
    }
);
$app->start();
运行此应用:
dapr --app-id app1 --app-port 3000 run -- php -S 0.0.0.0:3000 app1.php
/dsstatus 终结点与订阅中定义的 route 相匹配,这是 Dapr 将所有主题消息发送至的位置。
步骤 3: 发布主题
要发布主题,您需要运行一个 Dapr sidecar 的实例才能使用 Pub/Sub Redis 组件。 您可以使用安装在您本地环境中的默认的Redis组件。
用名为 testpubsub 的 app-id 启动一个 Dapr 实例:
dapr run --app-id testpubsub --dapr-http-port 3500
然后发布一条消息给 deathStarStatus 主题:
dapr publish --publish-app-id testpubsub --pubsub pubsub --topic deathStarStatus --data '{"status": "completed"}'
然后发布一条消息给 deathStarStatus 主题:
curl -X POST http://localhost:3500/v1.0/publish/pubsub/deathStarStatus -H "Content-Type: application/json" -d '{"status": "completed"}'
然后发布一条消息给 deathStarStatus 主题:
Invoke-RestMethod -Method Post -ContentType 'application/json' -Body '{"status": "completed"}' -Uri 'http://localhost:3500/v1.0/publish/pubsub/deathStarStatus'
Dapr 将在符合 Cloud Events v1.0 的信封中自动包装用户有效负载,对 datacontenttype 属性使用 Content-Type 头值。
步骤 4: ACK-ing 消息
为了告诉Dapr 消息处理成功,返回一个 200 OK 响应。 如果 Dapr 收到超过 200 的返回状态代码,或者你的应用崩溃,Dapr 将根据 At-Least-Once 语义尝试重新传递消息。
Example
@app.route('/dsstatus', methods=['POST'])
def ds_subscriber():
    print(request.json, flush=True)
    return json.dumps({'success':True}), 200, {'ContentType':'application/json'}
app.post('/dsstatus', (req, res) => {
    res.sendStatus(200);
});
(可选) 步骤5:发布带有代码的主题
如果您喜欢使用代码发布一个主题,下面就是一个例子。
const express = require('express');
const path = require('path');
const request = require('request');
const bodyParser = require('body-parser');

const app = express();
app.use(bodyParser.json());

const daprPort = process.env.DAPR_HTTP_PORT || 3500;
const daprUrl = `http://localhost:${daprPort}/v1.0`;
const port = 8080;
const pubsubName = 'pubsub';

app.post('/publish', (req, res) => {
  console.log("Publishing: ", req.body);
  const publishUrl = `${daprUrl}/publish/${pubsubName}/deathStarStatus`;
  request( { uri: publishUrl, method: 'POST', json: req.body } );
  res.sendStatus(200);
});

app.listen(process.env.PORT || port, () => console.log(`Listening on port ${port}!`));
如果您喜欢使用代码发布一个主题,下面就是一个例子。
<?php

require_once __DIR__.'/vendor/autoload.php';

$app = \Dapr\App::create();
$app->run(function(\DI\FactoryInterface $factory, \Psr\Log\LoggerInterface $logger) {
    $publisher = $factory->make(\Dapr\PubSub\Publish::class, ['pubsub' => 'pubsub']);
    $publisher->topic('deathStarStatus')->publish('operational');
    $logger->alert('published!');
});
您可以将此保存到 app2.php 当 app1 正在另一个终端中运行时,执行:
dapr --app-id app2 run -- php app2.php
发送自定义 CloudEvent
Dapr 自动接收发布请求上发送的数据,并将其包装在CloudEvent 1.0 信封中。 如果您想使用自己自定义的 CloudEvent,请确保指定内容类型为 application/ cloudevents+json。
Read about content types here, and about the Cloud Events message format.
下一步
- 试试 Pub/Sub 快速启动示例
- Learn about topic scoping
- Learn about message time-to-live
- Learn how to configure Pub/Sub components with multiple namespaces
- List of pub/sub components
- Read the API reference
Feedback
Was this page helpful?
Glad to hear it! Please tell us how we can improve.
Sorry to hear that. Please tell us how we can improve.